In my previous blog post, I demonstrated how to spin up a local Sitecore 10.1.1 SXA JSS environment using Docker with an XM1 setup and concluded on the last step which did not allow me to open up a JSS route page within Experience Editor. This was due to a missing installation of Node.js.
In this post, I will show you how you can go about setting up a Node.js install within your Sitecore Docker environment that allows Sitecore’s Editing UI controls to be server side rendered via the layout service; in turn enabling the full Experience Editor feature on your CM role.
Update Solution docker build file
I decided to update the Solution docker file as this will allow me to prepare all of the artifact folders (with Nuget libraries and dependencies etc.) together with the NodeJS artifacts (containing the .msi installer file) as part of the solution build image.
On line 39, we will first download the NodeJS installer .msi file and place this in a temporary folder – out\nodejs as part of the builder stage.
On line 51 we then copy the contents of this temporary folder (in this case the .msi file) to a final build artifacts folder called \nodejs.
Add arguments to CM service
Add the NODEJS version argument under the CM service entry. In my case, I have added this onto line 89 of my custom docker override file – docker-compose-xm1.sxajss.override.yml. This argument will be passed onto later to the CM docker build file which will inform docker to pull and install the correct NODEJS version that is compatible with my Sitecore version.
Using the same NODEJS version as the downloaded .msi file, input the same version into the environment configuration file.
NODEJS_VERSION=14.15.1
Update CM docker build file
On the CM docker build file, we will then proceed to parse the NODEJS argument and retrieve the .msi file from the solution stage and pass this onto the CM build image to install Node onto CM.
On line 20, we copy the msi file from the solution stage into the CM build image.
On line 24, we execute the installer file by running a silent install in the background with the /quiet flag.
Run Docker Compose
Once all steps are performed above, we are ready to re-run the docker compose file but this time with a –build flag to allow Docker to rebuild the CM build image and in turn allow NodeJS to be installed onto the CM role.
docker-compose -f .\docker-compose.xm1.yml-f .\docker-compose.xm1.sxajss.override.yml up -d --build
Once all containers are running in healthy state, open up the sample homepage route page in Experience Editor and you should be able to browse the page in full Experience Editor mode!
In this blog post, I will demonstrate how you can go about customising the docker examples repository (available using a 10.1 Update 1 release), to allow it to include both SXA and JSS with Headless service v16.0.
The use case: I was keen to get a local development environment which allowed developers to create a SXA JSS Tenant, Tenant Folder, Site and Site Folder, from the get go upon a fresh setup of docker. This case, there is no need to go through the tedious process of installing JSS package modules separately.
Prerequisites
Download the docker examples 10.1.1 release and ensure you are able to successfully run its containers from the default Sitecore runtime images and out of the box example solution image which comes with it.
Current State
The current docker examples 10.1.1 release currently comes with docker compose files override files (for xp0, xm1 and xp1) which installs SXA on top of the base Sitecore runtime image via the modules addition approach.
In my approach, I will choose to use Sitecore community images which includes both the Sitecore runtime image and SXA JSS image in one single image – removing the need of a modules addition approach.
I shall use the “custom image” folder of the docker example repository which includes a solution Dockerfile which will allow developers to deploy code changes as well.
Update environment file
As we are looking to reference the Sitecore community image repository which provides us with the SXA JSS image, we will need to add in two environment variables.
In my case, I chose to use an example of an XM1 topology file. As I am a fan of not reinventing the wheel, I simply made a copy of the docker-compose-xm1.override.yml file and renamed my new file to docker-compose-xm1.sxajss.override.yml.
In the new file, we will need to make a few changes to the following service entries – by updating the BASE_IMAGE url to reference the community base image.
Update Docker Files For CM, CD AND MSSQL Build Service Folders
On the cm service, remove the SXA_IMAGE and SPE_IMAGE arg properties and the lines which reference the addition of both the SXA and SPE modules.
In the Docker file contained within the cm service folder of the root build folder, remove the lines which reference the properties, therefore leaving you with a slimmer Docker file as the below.
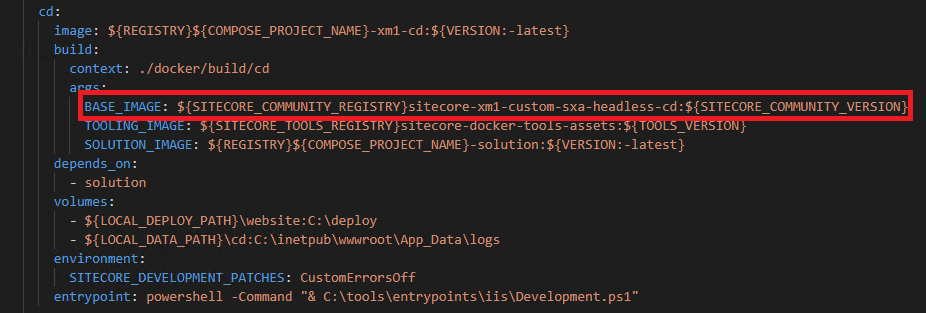
On the cd service, remove SXA_IMAGE properties. Repeat the same steps. The result docker file is as below.
On the mssql service, remove the SPE_IMAGE and SXA_IMAGE properties. Repeat the same steps. The result docker file is as below.
Keep the rest of other docker files unchanged as you will require the sxa solr cores to drive the indexes for both SXA JSS and SXA non-JSS sites.
Run Docker Compose
Once all changes are made to the above, we are ready to run our docker compose up command using the new override file – docker-compose-xm1.sxajss.override.yml
docker-compose -f .\docker-compose.xm1.yml -f .\docker-compose.xm1.sxajss.override.yml up -d
Once all containers have started and are in a healthy state, you are ready to browse to the Sitecore CMS instance. The default CM domain host being cm.dockerexamples.localhost.
In the Content Editor, we can verify that we are now able to add a JSS tenant and JSS site.
We can then further validate that creation of a JSS tenant and site works successfully as below. SXA features are enabled and SPE runs the tenant and site creation process without any issues.
And voila we are now able to get a docker build that prepares us with an SXA JSS local environment!
However, there is one more issue that remains – when we open a JSS route page in Experience Editor mode we get the following issue surfaces.
Error Rendering Sitecore.JavaScriptServices.ViewEngine.Presentation.JsLayoutRenderer: Failed to start Node process. To resolve this: [1] Ensure that Node.js is installed and can be found in one of the PATH directories. Current PATH environment variable is: C:\Windows\system32;C:\Windows;C:\Windows\System32\Wbem;C:\Windows\System32\WindowsPowerShell\v1.0\;C:\Windows\System32\OpenSSH\;C:\Windows\system32\config\systemprofile\AppData\Local\Microsoft\WindowsApps Make sure the Node executable is in one of those directories, or update your PATH. [2] See the InnerException for further details of the cause.
In my next blog post, I will aim to work on addressing this issue so that docker is able to start up with Node js pre-installed as part of the overall build and startup process.
This certification is a continuation on from the Sitecore ContentHub Administrator certification and is the final certification to complete. If you have not yet taken the Administrator exam, read no further as I strongly recommend you taking the ContentHub Administrator exam first before proceeding further. If you have not taken the Administrator exam, see my previous blog on some useful tips for passing the exam. It will make more sense when you view the competency areas tested in this exam.
In this blog post, I aim to provide my own personal experience on how I went about preparing myself for the Developer certification. It took me exactly under one month after the Administrator certification to get ready, equipped and pass this certification. What greatly helped me with this exam is having the Administrator knowledge all fresh on your mind as you will start to see things clearly how the Developer concepts start to enrich the feature and functionalities of ContentHub itself. Thus, I suggest not leaving a long break in between taking the two exams.
Please note that my advice below are only meant as a guide. There are certainly other ways to approach it and I am more than happy to hear your thoughts too.
Below are the listed competencies which will be directly tested in the exam.
Administration Competencies
Schema Design
UI Configuration: Search Component and Mass Edit
Branding and Theme, Custom Home Pages
Media Processing
Digital Rights Management
Data Import and Export
Security: Basic and Advanced
Reporting
Enterprise Domain Model: Schema and Metadata Management
UI and Advanced Pages
Entity Printing
Create and Configure a New Workflow
Developer Competencies
Metadata Processing Scripts
Develop External Page Components
Develop Web-enabled Action Scripts
Develop Triggers, Actions, and Action Scripts to Implement Custom Business Logic in Response to Entity Changes
Implement User Sign-in Scripts
Develop LINQ Queries in Combination with Action Scripts that Run In- Process and Out-of-Process
Each competency area provides links to the official documentation that will aid your study and preparation.
So yes you do see the list of competencies for Administrator – this meant that I had to revise again on my Administrator concepts again reviewing my notes especially around reinforcing my understanding on Domain Model Design and Schema Management, Security – Basic and Advanced, UI and Advanced Pages and Create and Configure a New Workflow. For domain modeling and schema management, it was particularly important to refresh your concepts on cardinality relationship between taxonomy definitions and entity definitions. See my previous blog post on Sitecore ContentHub Domain Terminologies.
READ DOCUMENTATION
There is no other better place than the official Sitecore ContentHub documentation. As mentioned each area area in the study guide provides links to the documentation which you must read.
Key tip for you is to read all subsections for a section specified. Where possible, apply and practice this in your sandbox to validate your understanding.
Learn on the different query types with LINQ to retrieve certain entities
Learn on the LINQ Filters when applying a query filter
Understand the code logic in retrieving a relation property and iterating over the relation property to retrieve children item property values.
Understand the different entity configurations for querying entities
Understand the code logic for CRUD operations on entities
Understand the difference between what the properties of EntityFactory and Entities for the MClient instance does.
Understand the code logic for external page components – particularly around events for page and component mediator.
Understand the lines of code on the different scripts types – pay attention to the sample code and discover what they do. Refer to the script examples.
Understanding how you will access an external authentication provider during user pre-registration and post-registration time.
Learn the different script types and what can / cannot be used by Actions and Triggers.
Learn on the different script execution types – In Process versus In Background
Learn on the different phases of the trigger execution and which use case of action will suit that particular phase
format
The Sitecore Content Hub Developer Certification Exam is comprised of 60 multiple-choice questions that are related to the administration of both the Professional and Enterprise implementations of Sitecore Content Hub. You must correctly answer 80% of the multiple-choice questions to pass the exam and earn certification.
Open or closed book?
The Sitecore Content Hub Administrator Developer Exam is closed book. You will not be allowed to refer to notes, study guides, training materials, web searches, Sitecore Content Hub installations, or other software when taking the test on Webassessor.
Register for the certification exam
Once you are feeling confident and prepared, go ahead to register for the exam. As a partner of Sitecore, you are entitled to a valid Sitecore voucher code. If in doubt, contact your Sitecore partner representative for confirmation.
This is be available once you have purchased the certification study guide and completed the Introduction, Study Guide and Competency Check.
Voucher Code Generation
Upon generation of the voucher code, copy this somewhere onto a notepad for safekeeping somewhere as this is generated only once.
The voucher will last 3 months from the date of generation.
Once signed in, click on the ‘Register for Exam’ button and select the correct exam.
Select a suitable time:
Enter the voucher code which was saved in the previous step.
Prepare laptop for exam
As for the Kryterion software exam tool itself, you must ensure you have a bare metal laptop that allows installation of the software to run the exam.
The exam is an online proctored and will require enablement of both your camera video and audio to operate during the course of the exam.
I strongly suggest preparing the installation of the software in advanced of your exam schedule and not to leave this at the very last minute.
Use a laptop with minimal security restriction to software installation and hardware feature enablement.
Day of certification
Ensure you allocate a peaceful and non distracting period during the day to take the exam. The exam lasts for a 120 minutes with 60 multiple choice questions. The developer exam is 20 minutes longer than the administrator exam. As such, do take a toilet break (or drink less water) before the exam as you will not have a chance to run out during the entire duration of the exam. I strongly recommend taking this in the late evening after work or in a quiet weekend free from work. Choose a quiet room with the door closed behind you and alert anyone who is with you that you are taking the exam so they do not accidentally walk in or call out for you. Secondly, remember to switch off your mobile phone or store it away on silent mode. All the very best and hope this article helped you.
In my previous post, I explained why one uses a taxonomy definition as part of building out the relationship model between your entity definitions. This is a crucial step in determining how you prepare ContentHub for your content creators and managers to work with your content.
Please note you will require the appropriate feature license of Content Hub – Free Modeling to leverage creation of custom taxonomy definitions.
In this post, I will show how one can go about creating an example of two taxonomy definitions. I will apply the use case of creating an Ingredient Type and Ingredient for a fictitious company which manages ingredients.
I will also like Ingredient Type to be made searchable by facet once I build out the ingredient listings later. Additionally, Ingredient Type can be later configured to be secured later based on a given user group policy. As such, Ingredient Type must be configured as a Taxonomy definition according to the principles of security and metadata inheritance.
In the Manage page, click on Taxonomy Definition tile and click on the ‘New Taxonomy’ button.
Next, fill in the details correctly with the word ‘Ingredient Type’ in the Name and Label field as below.
I will then go ahead to add several values as part of my IngredientType taxonomy definitions. Do note that I am using a single level hierarchy for this as it is just simple flat list of values.
Step 1: Look for the ‘+’ icon at the top right and enter a value ‘Acid Regulator’ in Name field and Label field.
Step 2: Repeat for the next set of values as below.
Once this is completed, you can view the value definition by inspecting the info icon.
Alternatively, you can also view the entities of the Taxonomy definition by browsing to the Entities tile.
Step 1: On the Manage page, click on the ‘Entities’ tile.
Step 2: In the search bar, key in the name of the taxonomy definition – FL.IngredientType or a keyword of it so that it brings up the definition in the listings.
Step 3: Click through into the FL.IngredientType row in the above step to view the list of values.
I will apply the same steps in creating the taxonomy definition for Ingredient. This time I will apply the following custom properties onto the Ingredient definition upon creation time.
Entity Name: FL.Ingredient
Entity Label: Ingredient
Ensuring the following custom properties are classified as such according to the field type and its expected behaviour. This is typically prepared well ahead of implementing the configuration in Content Hub so that you have a well organised and accurately defined schema with the correct property types and its relationship cardinality. This can certainly help avoid mistakes which otherwise will be very difficult to rectify later in the project – when content is later populated into unintentionally incorrect property fields.
Field Name
Description
Field Type
IngredientName
Display the ingredient name
String – Singleline
IngredientDescription
Display the ingredient description
String – Multiline
UnitOfMeasurement
Display the unit of measurement
OptionList – Single Value
IngredientCalories
Display the calories for a given unit of measurent
String – Singleline
IngredientTypeToIngredient
Display one or more ingredient types
Taxonomy Relation – Many to Many
IngredientToFile
Displays a thumbnail image of the ingredient when displaying this in a listing.
Taxonomy Relation – One to One
Please note when configuring a property of a taxonomy relation to reference a rendition / image in Content Hub, you must enable the property, ‘Is rendering relation’ as part of the relation. This can be found under the ‘Advanced’ tab of the member property. In my case, IngredientToFile is configured as such below.
As such you will expect to have the following property fields added and configured as such below for the FL.Ingredient taxonomy entity definition.
In my next post, I will go onto show how we can go about configuring a search and listing page which lists the ingredients with a searchable facet filter field called – Ingredient Type. Additionally, we will also create a basic Ingredient Detail page to display the details of a specific ingredient – providing the basic content management experience for content authors.
I was extremely happy to have passed this certification recently before Christmas.
As for those who are new to Sitecore ContentHub, this platform provides digital capabilities such as a digital asset management (DAM) system and a content marketing platform (CMP) for content authors to take control of the entire content creation process lifecyle and enforce a standard governance that aligns to their organisational needs.
The recent Sitecore for Administrator for ContentHub certification was certainly no easy feat.
In this post, I will share with you useful tips which got me in the right trajectory to pass this certification. This assumes that you have had no prior experience in using the platform and starting from bear scratch.
Recommended
For newbies who have no experience with using the platform nor have even seen what this platform is all about, I recommend going through the Sitecore ContentHub 4 collection which contains the following content:
You must have a Sitecore Content Hub 4 sandbox setup where you can login and start applying practical exercises to your learnings. This is an absolute must which greatly helped my memorisation and understanding of key learnings along the way.
Competencies
The guide talks you through the competencies which will be directly tested in the exam.
Competency 1: Schema Design
Competency 2: UI Configuration: Search Component and Mass Edit
Competency 3: Branding and Theme, Custom Home Pages
Competency 4: Media Processing
Competency 5: Digital Rights Management
Competency 6: Data Import and Export
Competency 7: Security: Basic and Advanced
Competency 8: Reporting
Competency 9: Enterprise Domain Model: Schema and Metadata Management
Competency 10: UI and Advanced Pages
Competency 11: Entity Printing
Competency 12: Create and Configure a New Workflow
Each competency area provides links to the official documentation that will aid your study and preparation.
OBTAIN A SANDBOX
Get yourself access to a ContentHub Sandbox. I cannot stress this further. You may contact your Sitecore Sales Representative to obtain and provision access to you. Ensure that you have sufficient licensed features assigned to your sandbox in order for you to experiment on concepts across all of the competency areas. The particular one that stood out for me is Competency 9 that covers domain modeling basics, extending and managing your schema – as this will cover alot of ground concepts in metadata and content management. In this instance, ensure that your Sandbox comes assigned with the Free Modelling license.
READ DOCUMENTATION
There is no other better place than the official Sitecore ContentHub documentation. As mentioned each area area in the study guide provides links to the documentation which you must read.
Key tip for you is to read all subsections for a section specified. Where possible, apply and practice this in your sandbox to validate your understanding.
The instructor led course contains the Professional and Enterprise Mock implementations which contain valuable practical lab exercises that allowed me to apply real world scenarios. It absolutely reinforced my understanding on key learning concepts and understanding the what/why/how particularly around key domain design and implementation principles.This maximises your use of your sandbox and gears up your preparation for the exam.
The key takeaways for me is understanding important basic concepts of domain model design, custom entities with its association and cardinality, configuring administration pages and setting up custom state workflows for your custom entity definitions.
YOUTUBE VIDEOS
If you find the documentation too dry to start with, or if instruction steps lack clarity (I encountered some sections which were complex for my beginner level) in the Professionalised and Enterprise mock implementations, refer to some useful YouTube Videos. Ones which helped me is below is this ContentHub Admin video collection by Ankit Joshi – https://www.youtube.com/playlist?list=PLgr04NsypZYBeaZoJ7tEKJThTKS7CDfha
Register for the certification exam
Once you are feeling confident and prepared, go ahead to register for the exam. As a partner of Sitecore, you are entitled to a valid Sitecore voucher code. If in doubt, contact your Sitecore partner representative for confirmation.
This is be available once you have purchased the certification study guide and completed the Introduction, Study Guide and Competency Check.
Voucher Code Generation
Upon generation of the voucher code, copy this somewhere onto a notepad for safekeeping somewhere as this is generated only once.
The voucher will last 3 months from the date of generation.
Format
The Sitecore Content Hub Administrator Certification Exam is comprised of 50 multiple-choice questions that are related to the administration of both the Professional and Enterprise implementations of Sitecore Content Hub. You must correctly answer 80% of the multiple-choice questions to pass the exam and earn certification.
Open or closed book?
The Sitecore Content Hub Administrator Certification Exam is closed book. You will not be allowed to refer to notes, study guides, training materials, web searches, Sitecore Content Hub installations, or other software when taking the test on Webassessor.
Enter the voucher code which was saved in the previous step.
You will expect to see a zero USD price as you will have purchased this exam along with the Study Guide from the Learning Sitecore portal previously.
Prepare laptop for exam
As for the Kryterion software exam tool itself, you must ensure you have a bare metal laptop that allows installation of the software to run the exam.
The exam is an online proctored and will require enablement of both your camera video and audio to operate during the course of the exam.
I strongly suggest preparing the installation of the software in advanced of your exam schedule and not to leave this at the very last minute.
Use a laptop with minimal security restriction to software installation and hardware feature enablement.
Day of certification
Ensure you allocate a peaceful and non distracting period during the day to take the exam. The exam lasts for a 100 minutes with 50 multiple choice questions. I strongly recommend taking this in the late evening after work. Choose a quiet room with the door closed behind you and alert anyone who is with you that you are taking the exam so they do not accidentally walk in or call out for you. Secondly, remember to switch off your mobile phone or store it away on silent mode. Lastly, take a toilet break (or drink less water) before the exam as you will not have a chance to run out during the course of the exam. Trust me I learnt my lesson from this.
Final tip is to ensure your memory is well fresh and ready to answer the questions. I cannot emphasise more the importance of memorisation to key terminologies and concepts across each competency area. Your documentation and lab exercises are again your best friends in passing the exam.
I hope this helped and I wish you the best of luck.
Sitecore Content Hub (SCH) is a system that overall streamlines the content creation process and enables content authors to author, review and approve content pages in one single location. As I started using this platform and applying real world scenarios, I began to marvel on the extreme importance of accurately designing the data domain model. As you know each piece of content created in SCH is made up of an entity. Entities are created and further enriched by metadata.These form the building blocks of one or more content pages that are implemented in SCH. The second importance is ensuring that these entities align with your customer’s organisational requirements and domain language.
Therefore, it is crucial to understand the entities that make up your client’s business requirements. You perform a systematic approach by first planning, sketching and fleshing out your basic domain models (entities) and the relationships between them. This includes modelling out attributes/member properties of your entities and how one entity relates to another entity by their cardinality rules.
What is SCH?
Commonly termed as Sitecore ContentHub. Most folks in the Sitecore community tend to coin this as SCH for short. In my post, you may see some of these terms.
This blog post is part of a series on which it attempts to address simple use case scenarios around content creation on the context of a Recipes data model. I have then worked on to identify the following suitable identities for my use case:
Firstly it explains the concepts of an entity definition, taxonomy definition, entity relation and taxonomy relation.
These terminologies and concepts were important to grasp and especially for the Administrator exam certification.These of course is not exhaustive list but were key drivers to my understanding.
As I progress through my series, I will be using some of these terminologies and putting this into action in constructing the Recipes data model in Content Hub.
Option List
Provides a selected list drop down (single or multivalue) that can be editable/readable on your detail page.
Cannot be applied with security and metadata inheritance.Therefore it cannot provide faceting on your custom search page.
Suitable to store a short list of data entries (less than 10 items) and does not support search and paging.
Taxonomy Definition
Represents the definition of metadata to enrich your main entity for the purpose of search and faceting – that is often called metadata inheritance. This means you can apply faceting on the definition of a custom search page.
Able to apply security inheritance when configuring rules on your User Group Policies – when you are creating conditions for your rules based permissions.
Suitable to store a long list of data entries (typically more than 10 items) that will support search and paging.
Entity Definition
Also known as a non-taxonomy definition.
Represents the main entity that typically represent the main content page with all of its fields and relational data. You will think of this as the page that your content authors will approve as one piece of content that encapsulates all of the required information needed with its relational data.
Cannot be used as facets as part of custom search pages.
Cannot be used for security inheritance and therefore not usable in User Group Policies.
Entity Relation
Represents a relationship with a non taxonomy definition – usually represents the association detail on the member property as a Parent to Child.
Taxonomy Relation
Represents a relationship with a taxonomy definition – usually represents the association detail on the member property as a Child to Parent.
Once your entities are identified, the next step is to classify them accordingly to the necessary requirements based on the aforementioned definitions above.
In my use case, the Recipe page shall serve as the main content page which encapsulates all the fields and relational data which will be the suitable authoring page – which can be managed by a target state flow.
Secondly I will like to utilise a search page which shall leverage facets search using these entities – Ingredients, Ingredient Type and Cuisine Type. This will facilitate tagging of recipe assets and enhance the search experience.
Entity Classification
Entity Type
Resultant Entity
Entity Definition (Non Taxonomy Definition)
Recipes
Taxonomy Definition
Ingredients, Ingredient Type, Cuisine Type
Option List
Recipe Type
In my next blog post, I will demonstrate setting up an example taxonomy definition entity and how you can repeat the same set of steps for the rest of the other entities. It will also go on next to define a non-taxonomy definition and finish off with examples of creating association / relation member properties between the entities – ultimately implementing the entity domain model which will help me later to create a basic search and create page for my Ingredients and Recipes entity.
Following up from my previous article on setting up a running instance of Sitecore 9.3 SXA and JSS within Docker, the next logical step is to setup a JSS app. In my case, I chose to use an Angular app.
To obtain the JSS sample app from Sitecore’s sample app repositiry, you must first install the Sitecore JSS CLI using npm. This article assumes you have already performed the requirements to have JSS CLI installed on your host or VM machine.
Please ensure you are also using a LTS version of Node installed on your machine.
For more details, you can refer to the official Sitecore JSS documentation – on installing JSS for Angular.
In order to ensure, you are creating the correct JSS sample app for the correct target Sitecore version, be sure to visit the Sitecore compatibility table and ensure you are pulling the correct JSS version sample app. In my case of Sitecore 9.3, I will pull down a sample Angular app of version 13.0.
Below outlines the steps to get an SXA JSS site up and running in Sitecore.
Step 1: INSTALL the sitecore angular app
Run the following command to install the app that is of the 13.0 branch release.
For more information on JSS CLI Commands, you may refer here.
JSS CLI will finish up and complete with the above.
Once completed, you will have the following working directory setup.
To ensure all is running smoothly, run the following command to verify that your sample app is able to run in disconnected mode.
jss start
This will open up the styleguide page in localhost://3000. The below is the expected resultant page.
Step 2: CREATE SITECORE API KEY
Given that you have a running local Sitecore instance in Docker, proceed to setup the Sitecore API Key. Browse to /sitecore/system/Settings/Services/API Keys. Right click on the API Keys folder and insert ‘API Key’.
Leave the default name ‘API Key’ and click OK.
This will create the API Key item.
Fill in the relevant fields with the following values for local development purpose only.
Field
Value
CORS Origin
* (to allow for all origins to consume the layout service)
Publish the Sitecore Item API Key. This step is required for Sitecore 9.1 and above.
If you do not publish the API Key, Sitecore will not be able to render the response.
Verify that the Layout service url is returning back a response. You should be expected to see a valid response returned as below. This means that you have now correctly setup the API Key to authenticate calls to the Sitecore Layout Service.
STEP 3: Create SXA JSS Tenant and Site
Next we will need to create the SXA JSS Tenant and JSS Site in which will allow us to deploy our sample demo JSS app into. For this we will go ahead and create the below in our running Sitecore CM Instance.
Enter a name such as ‘SXA JSS Tenant Demo’.
This will create the ‘SXA JSS Tenant Demo’ tenant folder.
Next, we will create the new JSS Site that will retrieve the imported artifacts and sitecore items from the manifest data created in our Sitecore JSS app. This will be described in our next step – Deploy JSS App to Sitecore.
Right click on the created tenant folder, and insert ‘JSS Site’.
In the ‘Create a new JSS site’ dialog box under the ‘General’ tab, fill in the below details.
Site name: jsssampledemo Host name: jss.dev.local
Because we are deploying the JSS app to an SXA JSS Site, we must ensure we follow the standard guidelines in ensuring the artifacts and manifest data is imported correctly to the target site.
Once created, you will have the SXA JSS site setup and created.
Step 4: CREATE JSS DEPLOYMENT CONFIGURATION
This step is the final step in deploying the JSS app to Sitecore.
Open up the JSS app with Visual Studio Code.
Press CTRL-Shift-‘`’ to open the Integrated terminal so that you can run commands from within it.
In the root of your sample demo JSS app, run the following command to first setup the deployment configuration.
jss setup
Fill in the necessary details into the question prompts and ensure you fill in the correct information. Below were the key inputs placed into the fields.
Once filled in, this generates the jsssampledemo.deploysecret.config file within the JSS app working directory which contains the deployment secret which will be used for by the JSS import service to deploy the artifacts and manifest data into the target Sitecore site.
Go the the Site Setting item, and in the Deployment Secret field, paste in the GUID value that was generated in the deployment configuration file in Step 4.
sTEP 6: dEPLOY THE JSS APP to SITECORE
The next thing to do is then deploy the compiled artifacts (that comes in a JavaScript bundle) and manifest data (containing route data that is mocked for route pages along with components, templates etc.) into the JSS Sample Demo SXA site.
This will start the deployment of the artifacts and manifest data (route pages, placeholder settings, components and data templates). This will usually take about 1-2 minutes for a first round deployment in which the target site is filled in with the route pages (from the manifest route data) along with references to its placeholders and components.
Once the deployment is completed, you can refresh the Content Tree to view the sample route pages under the jsssampledemo site. Open up the home page in Experience Editor and you will finally be able to have a fully working editable StyleGuide page in Sitecore!
At this moment, you will have a local development environment of a Sitecore hosted JSS app in connected mode. Enjoy Sitecoring!
This article discusses on how you can go about setting up a running Sitecore 9.3 with SXA and JSS installed onto a simple xp0 topology setup. It attempts to detail some walkthrough steps which can help you get started with an instance and prepare it for a JSS local development in Sitecore connected mode.
It is a Part 1 out of 2 series in setting up a JSS SXA vanilla instance in Sitecore and subsequently deploying a JSS app into the running instance.If you have one that is already running in Sitecore docker, you can go straight to Part 2 of my next article.
I am using a Windows 10 20H2 Build version to host my docker containers. As such, please be sure to target your Sitecore versions to 20H2. As Windows requires the host OS version to match the container OS version.
This article assumes you have the pre-requisites setup to run Sitecore containers using Docker in a Windows environment. If you have not gone through the pre-requisites on setting up your environment for Docker, I suggest you follow Sitecore’s well documented article on setting up the environment before proceeding further.
STEP 1: setup vanilla sITECORE 9.3 SXA AND JSS INSTANCE
Once downloaded, you will have a working directory with the source files as below.
Browse to the build folder. Open up Windows Powershell in ‘Administrator’ mode and initialize the environment with the license path variable setup. In my case, I stored my valid Sitecore license file in a specific folder path.
The process will take a few hours to complete pulling and building the images onto your Docker station. Once the build completes successfully, you will be able to view the list of installed images.
Finally, browse to the windows/test/9.3.x folder (containing the various Sitecore topology docker compose files) within your working directory to stand up your a fresh vanilla 9.3 instance that comes installed with SXA and JSS! In my case, I chose the XP topology.
##Start up containers
docker-compose -f .\docker-compose.xp.sxa.jss.yml up -d

##Stop all containers
docker-compose -f .\docker-compose.xp.sxa.jss.yml down
Run docker ps -a to view the list of containers which are running and inspect their status. Ensure these are ready and in healthy state.
Once all containers have started and are in a healthy state, you are ready to browse to the Sitecore CMS instance.
At this point, you have successfully setup a running Sitecore instance with SXA and JSS installed.
In the next step, we setup the hostnames and self signed certificate for our CM container so that we can prepare this for local development with our sample JSS Angular app.
STEP 3: SETUP HOSTNAME with self signed certificate for cm container
In this section, we will aim to setup a custom hostname – jss.dev.local.
First, we will aim to create a wildcard self signed certificate that captures subdomains suffixed with *.dev.local.
Michael West has an incredible article which describes how to go about setting up a self signed certificate with Docker with HTTPs. Follow the instructions outlined in his article.
Open the folder Startup and with an elevated PowerShell console run the following command: `.\createcert.ps1 -certificatename cert -dnsNameList “*.dev.local”
Copy the 4 generated `cert.*` files in the `startup` folder in this Sitecore Docker Images cloned repository (`\build\windows\tests\9.3.x\startup`).
See below figure.
Next, we configure our hostname for your CM container.
As a pre-requisite for Docker to be able to standup IIS hostnames which map to our running containers, there is this amazing module which was written by Rob Ahnemann – Windows Host Writer which allows Docker to handle updating of running container hostnames onto your host file. Thank you Rob for this nifty service and thank you to Rock Paper Sitecore’s article for pointing out Rob’s service.
Open up the docker-compose yaml file which will be used to start up the containers.
Add this new service as part of the services collection.
You do not need to manually download anything. In your next run of docker-compose up -d, Docker will be smart to pull and build this image onto your Docker station and subsequently listen for host headers configured for other running containers.
Add the following to the cm service.
The code snippet below replaces the entrypoint with the the startup powershell script that comes with cloned Sitecore Docker repository. This script will be responsible in retrieving the environment host header configured for the container service and subsequently add the host header as an HTTPs binding. This binding is then attached to the certificate thumbprint of the generated wildcard self signed certificate in the trusted root store. Once the above is done, the script subsequently runs the Development.ps1 script.
Next we will require to setup the volume for the container so that we can map the location of the startup script stored in our working directory to the folder stored inside the container. This allows the container to pick up the startup script and execute it on a docker compose up.
At this point, save the updates made in Step 3 and Step 4 in the docker-compose yaml. In my case again, this is the docker-compose.xp.sxa.jss.yml file.
step 5: run docker compose up
Run a docker-compose up again.
You will notice that the host file gets updated automatically when the containers are in a ready and healthy state.
Next, open up a browser and key in https://jss.dev.local and VOILA. You will notice the browser now displays the page successfully with the valid self signed certificate setup.
The above was a simple host header and binding setup for a CM container.
You can also add host headers to further containers. Typically you will setup the same for your CD container which you can repeat with the same steps as the above. You will provide appropriate host header names to differentiate your CM and CD urls.
Special thanks again to the Sitecore community for showing the way!
In my next article, I will show you how you can go about creating and deploying a basic sample Angular JSS app to an SXA JSS site instance hosted on this running Sitecore Docker xp0 topology.
In my walkthrough, I am simply leveraging on the instructions provided in Sitecore documentation links above. I assume you already have a valid licensed copy of Windows Version 10 Pro or Enterprise edition.
Please note you will not be able to run Docker Desktop for Windows on Windows Home edition as it does not support HyperV features.
Step 1: Check Firewall Rules
I am using VMWare Workstation Player 15 to run a version of Windows 10 20H2. If you are working behind any company firewall, be sure to free up these ports.
You may run Ctrl-R and hit wf.msc. This will open up the Windows Firewall properties and allow you to allow specific ports to be enabled.
If you are running Docker behind your company VPN, I suggest disabling the VPN connection as this can introduce interruption to starting up the connectivity between the containers or the container itself.
If you insist of running Docker whilst connected to your company VPN, refer to Sitecore Gabe’s post for more details on how to possibly make this work for you.
Step 2: Enable nested virtualization
This is a setting on your VMWare application will allow you to spin up VMs or containers within a guest VM. In this case, this setting was required by Docker Desktop to start up containers.
You can find this setting by navigating in to your Guest VM virtual machine settings > Hardware > Processors and ensuring the following is checked.
Step 3: Ensure you have the following enabled on Windows
Virtual Machine Platform
HyperV feature and sub-features
Refer to Microsoft article on how to go about enabling HyperV on Windows 10.
This will take a few minutes and once installation is completed, restart the Guest VM to ensure Docker is fully installed and configured appropriately.
Right click on the Docker icon, and ensure you switch to Windows Container.
Sitecore containers do not run in Linux containers.
Once restarted, you should be able to find the Docker whale icon loading and completing its startup. You should be notified in the tray icon at the bottom right of your screen when docker has fully started.
Click on the whale icon once, and the below should appear.
Optionally you can also open Powershell and run the following command to check the version of Docker that is running on your system:
Step 6: Check the Sitecore Version property value.
Depending on you build version of your Windows installation, you must ensure that the correct and compatible Sitecore images are pulled onto the system. Otherwise, you will encounter issues in not able to start up containers.
Inspect the environment file (.env) file and ensure the correct SITECORE_VERSION property value is applied.
In my case, this is 10.1.1-20H2.
Step 7: Change the Isolation property value.
Change the default Isolation property value to process from the default value of ‘default’. Apparently this setting made a difference for me as it allowed my unhealthy containers to start healthy. According to conversations in Sitecore Slack, setting isolation=process allows docker to run in a more stable fashion.
Step 8: Copy over a valid Sitecore license file.
Place a valid copy of your license.xml file in the following directory path C:/License/license.xml. Ensure that the license is able to support the installation of Sitecore v10.1.1.
Step 9: Run the init.ps1 script
Open up Powershell in administrator mode, and run the following command to populate the correct variable values in the environment (.env file).
.\init.ps1 -LicenseXmlPath C:/License/license.xml
This will not overwrite the SITECORE_VERSION property value that was applied in Step 6.
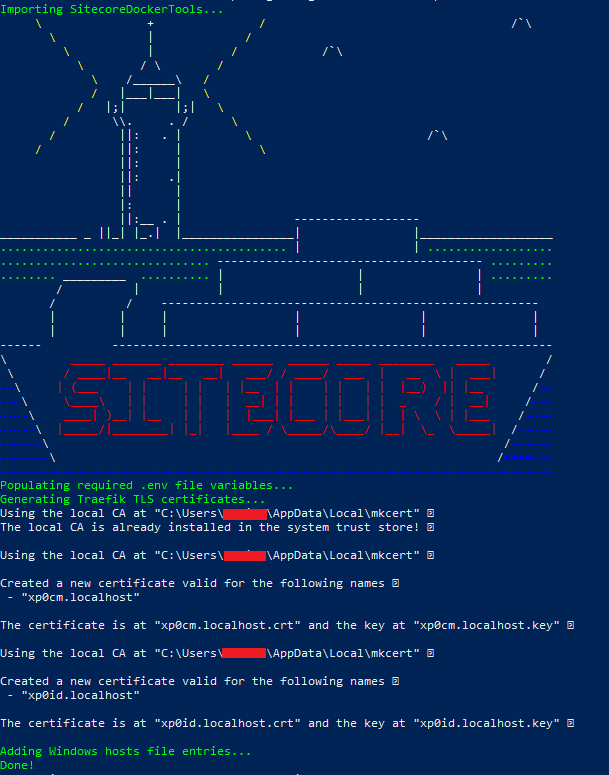
The PS script will also create local self signed certificates for traefik (acts a reverse proxy role to securely transmit information from the client to the Sitecore roles), identity and cm roles.
Once the script is run successfully, you are ready to start up the containers.
Step 10: Start up the Sitecore containers
Run docker-compose up -d.
-d to detach log streaming of the docker process to the powershell session. Instead, the process is run in the background.
If you have not pulled down the Sitecore images to your local repository, docker will download all the necessary images based on specified properties outlined in environment file. The process takes 1-2 hours to complete all image downloads, depending on your network speed and virtual machine capacity.
You will be able to verify that all containers have successfully started once PS has returned you back to the prompt.
Outcome
Run docker ps -a to view all running containers and its health status. All statuses must be healthy in order for the Sitecore topology to run on your system.
You can begin to start up the relevant pages and login to Sitecore.
Troubleshooting my installation
I realised when attempting to start up my containers (by running docker-compose up -d), I was consistently hitting the issue whereby the following four service containers failed to start.
Unhealthy containers
Solution 1: If running on Windows 10 20H2, change the following properties in the environment file:
Ensure the Sitecore version matches with your build version.
Change the isolation value to process
If you are unsure about your version, type ‘Run’ in the windows search bar at the bottom left hand of your screen and hit ‘Enter’.
Type in ‘winver’.
This will display the build version of your Windows 10 Operation System
Solution 2: Turn off company VPN devices and client chats
If containers still continue to remain unhealthy or instable, I will recommend performing this step.
Solution 3: Stop all ports running in IIS
If containers will remain unhealthy, I will suggest performing an IIS reset and stopping all service to ensure there are no conflicting ports with Docker that are in use.
You can run the below command and repeating docker-compose up -d
iisreset /stop
Solution 4: SQL Password
Changing the SQL_SA_PASSWORD in the .env could also solve the issue. It is Important to run the clean.ps1 to clean up generated database files prior to running docker compose up again. Once done, rerun again docker-compose up in case if you are using the Getting Started template.
To resolve, change the SQL password in SQL_SA_PASSWORD to fit the default SQL Server policy. After changing the password in the .env file, remember to clear the mounted SQL data folder after running docker-compose down. You can manually delete its contents, or use a clean script (see the clean.ps1 example in the the Docker Examples repository).
I hope this article walkthrough helped you to get through setting up a first running instance of Sitecore v10.1.1.
In my next upcoming article, I will demonstrate how I went about troubleshooting issues with unhealthy Sitecore containers and what led me to make the next best decisions.
This issue is to do with Sitecore xConnect Search service unable to rewrite the sync token issue for the following two reasons:
Core database shared with more than one Sitecore instance. This can be a potential problem as most developers may share the core database between their local and development environment.
Missing Solr aliases to both the xdb collection and xdb rebuild collection when configuring Solr provider to use SolrCloud.
In order to address this issue, the following prerequisites apply:
Rebuild the xDB Solr Index by following the steps outlined in the article below:
The last one I wanted to mention was the place to run “.\XConnectSearchIndexer.exe -rr” in the terminal. Please ensure to run it under this path: “D:\local\Temp\jobs\continuous\IndexWorker[WORKING]”. More details can be found here: https://doc.sitecore.com/developers/91/sitecore-experience-platform/en/rebuild-the-xdb-index-in-azure-search.html (Although this page says Azure Search, however since it’s Azure Search, this assumes the context of Sitecore being hosted in Azure PaaS, where the other Solr documentation page is assuming on a Windows Server hosting)